
By Kathryn Peck
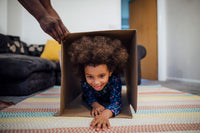
It’s so often true: children are more interested in playing with the box than the toy inside. Old boxes always find a second life in our home before they head for the recycling bin. More recently we’ve used cardboard boxes as an arena for our Safari Ltd horse figures and obstacles in a dog show for stuffed animals, but ideas are endless. And believe it or not, allowing your child to get creative in this way can help with problem-solving and decision-making skills, and it can help build confidence and self-expression.
So, hold onto your shipping boxes. With some of these ideas in mind, you’ll be down-right thrilled for the next rainy day.
A Coloring Board. Break down the box and use is as a gigantic coloring page. Markers work great, but OOLY Paint Sticks are the best for coloring on cardboard, particularly if you want to avoid messy paints. If you like to plan ahead, make some outlines of shapes for little ones to color in.
A Cityscape. With a flattened cardboard base, the sky’s the limit. Use smaller boxes (cereal boxes, tissue boxes paper tubes, etc.) for buildings and duct tape for roads. A hot glue gun (parents only!) works well for securing smaller boxes/buildings, but you can also use duct tape. Paint or color the buildings and accessorize with toy cars, animals, and anything else you can find.
A Playhouse. Depending on how large you want your playhouse to be, you might join several boxes together with masking tape. Reinforce folds with extra strips of cardboard as needed. If you’re adding a roof, skylights are a great amenity; just cut window shapes and tape clear plastic bags over them. Windows and a door are a must; window boxes are adorable and a great use of extra pieces, but not a must. Paper circles make great roof shingles when glued on, and of course, decorating the exterior might be the most fun of all.
A Laptop. On a smaller scale, a cardboard laptop is fun for office roll play. A folded piece of cardboard is easy enough, but the design is the keyboard (stickers or printed, cut, and glued letters/numbers ) and the screen (black paper or a more intricate screen that you’ve designed and printed.). We’ve seen some designs covered with aluminum foil for a grey look.
A Castle. If you have several boxes available and grey paint, a cardboard castle is a great option. Paper towel tubes for turrets, and a drawbridge that opens and closes are a must. One of the most fun parts of this project is getting the opportunity to look at real-life castles for inspiration. Check out the full tutorial at Be A Fun Mum.
A Box-O-Holes. Huh? This is truly hours of fun for little ones. Simply cut holes of various sizes in the top of a box and give your little one a collection of items to put in the holes. Pompoms, blocks, even Q-Tips; anything goes.
A Laundry Set. You’d think I’d have done enough laundry, but not with this adorable craft idea. Two boxes with circle doors cut in each, knobs made from recycled juice containers, and tiny glued-on felt numbers is just about it. Now all you need is the dirty laundry. Check out the full tutorial at Be A Fun Mum.
A Train. Simply put, a line of several boxes in a row will make a great start to a cardboard train. Bonus if they’re big enough for your little ones to sit in. Paper wheels can be glued on, and each car can be painted a different color. For the engine, secure another smaller box onto the front with tape. Make paper tickets and grab your stuffed animals for more passengers.
A Dollhouse. Grab your glue, paper, crayons and markers and design a house for your little one’s little friends. With a scissors, you can make a door and small windows. Don’t forget the inside: fabric scraps for rugs, draw pictures on the walls, and if you don’t have dollhouse furniture, get creative with smaller boxes and toilet paper rolls.
A Mini Bed. With these pattern pieces, it’s easy to make a toy bed for dolls or stuffed animals. All you need is cardboard and scissors. Of course, decorating the bed is half the fun, too. Check out the full tutorial at Girl Nesting.
-
About the author: Kathryn is the owner of Bicycle Pie and mom of 4 little ones. Also a writer, editor, and former owner of one of Boston's premiere baby boutiques, she continues to write about motherhood, children's products, family life, and all other things that test our skills and patience as parents.